Create an EXE or Setup File in .NET Windows Application
Hi .NET Architects!
Visual Studio
Setup and deployment Projects provides to make an executable or installer file in .NET windows application is easy and rapidly.
Visual Studio provides templates for four types of deployment
projects: Merge Module Project, Setup Project, Web Setup Project, and
Cab Project. In addition, a Setup wizard is provided to help step you
through the process of creating deployment projects. You can see the
templates and the wizard in the
New Project dialog box under the
Setup and Deployment Projects node.
The following are guidelines for choosing the right type of deployment project for your project.
1)
Merge Module Project : Packages components that might be shared by multiple applications.
2)
Setup Project : Builds an installer for a Windows-based application.
3)
Web Setup Project : Builds an installer for a Web application.
4)
Cab Project : Creates a cabinet file for downloading to a legacy Web browser.
5)
Smart Device Cab Project : Creates a Cab project to deploy device applications.
This topic demonstrates deployment using a Setup and Deployment Project.
Setup Projects
Setup projects allow you to create installers in
order to distribute an application. The resulting Windows Installer
(.msi) file contains the application, any dependent files, information
about the application such as registry entries, and instructions for
installation. When the .msi file is distributed and run on another
computer, you can be assured that everything necessary for installation
is included; if for any reason the installation fails (for example, the
target computer does not have the required operating system version),
the installation will be rolled back and the computer returned to its
pre installation state.
I. Create Setup Project
The following steps will gives the elegant guidance to create an executable or installer file.
1
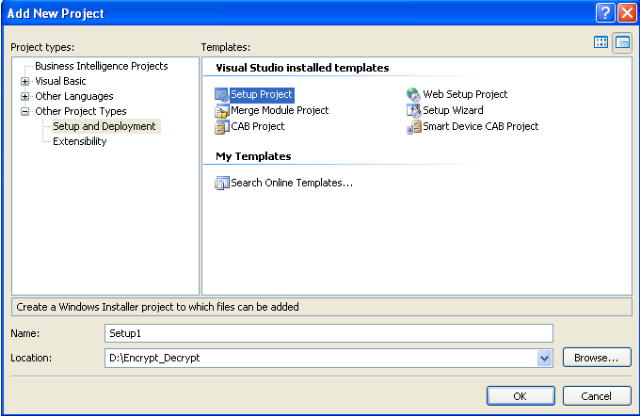
. Go to file menu > click Add > new project >now “Add New Project” dialog will appear.

2.
Select the “Other Project Types” and click “Setup and Deployment” projects,Choose “Setup Project” give name project name in name text box finally click OK.
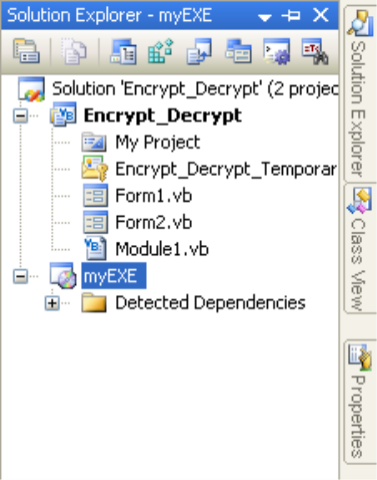
 3. New project appear in solution explorer,for eg., you have give the name “MyEXE” file will be displays with given name.
 4.Right click the MyEXE > go View > click “File System”
 5.You can see the “File System on TargetMachine”under three folders
Application Folder
5.You can see the “File System on TargetMachine”under three folders
Application Folder
User’s Desktop
User’s Program Menu

6
.Select Application Folder and right click Add>Project Output>select Primary output
 7. Select User’s Desktop right click on the right side pane>click
create new shortcut>select output file from Application
folder>change the file name from primary output name to MyEXE
7. Select User’s Desktop right click on the right side pane>click
create new shortcut>select output file from Application
folder>change the file name from primary output name to MyEXE

Next >>
 Same procedure follows the user’s program menu also
8.If you want to change the Manufactures name, just right click the project go to properties
Same procedure follows the user’s program menu also
8.If you want to change the Manufactures name, just right click the project go to properties
 Change the properties as per you requirement
9.Finally Build the new project
Change the properties as per you requirement
9.Finally Build the new project
 11. Select the Release folder for build. (Select ‘Properties’ in right click of Setup Project)
 12. Set the Compression Mode
Mode 1: Optimization for speed (Installation Speed)
Mode 2: Optimization for size (Setup file size)
12. Set the Compression Mode
Mode 1: Optimization for speed (Installation Speed)
Mode 2: Optimization for size (Setup file size)
 13. Once successfully build the setup. Please look up in inside Release folder

When you want to install the
setup file or exe file on the client machine, before you should be installed
.NET Framework on that machine because
,
Applications and controls written for the .NET Framework v2.0 requires
the .NET Framework Redistributable Package version 2.0 to be installed
on the computer where the application or control runs. (Framework 4.0 need .NET Framework 4 Client Profile).
#1 .NET Framework 2.0 Redistributable Package
Downlaod
#2 .NET Framework 4 Client Profile
Downlaod
II. Create shortcut icon in User’s Desktop, User’s Programs Menu and Add/Remove Programs
Note: System support only .ico file format
a. User’s Desktop
Step 1: Add an icon file (.ico) in project
 Step2: Select the icon file
 Stpe3: Icon file added in Application Folder
 Step4: Select ‘User’s Desktop’ or ‘User’s Program Menu’ and right click on right side pane
 Step5: Add primary output of actual application and click ‘OK’ to select
 Step6: Rename the actual name to your desired project/product name
 Step7: Here the sample product name is ‘Your Product Name’ for demo purpose
 Step8: If we want to add icon on shortcut, Click Properties Window
 Step 9: Select Icon, next Browse icon file
 Step10: Browse icon file in Application Folder
 Step 11: Click ‘Application Folder’
 Step 12: Add File button will be enable once you have clicked the Application Folder
 Step 13: Select your product icon and Click ‘OK’
 b. User’s Programs Menu
Kindly follow the same steps for shortcut added in User’s Program Menu.
C. Add/Remove Programs Icon
If you want to add your icon in Control Panel > Programs >Uninstall, You need to follow the below steps.
 Step 1: Select the setup project in Solution Explorer and right click, select the ‘properties’

Add the icon from Application Folder.
View Icons
Install your setup in target machine, You can view the shortcuts in Desktop, Start Menu and Uninstall Programs.
Figure 1: Shortcut icon in Desktop
 Figure 2: Shortcut icon in User’s Program Menu
 Figure 3: Shortcut icon in Uninstall Programs

III. Add Prerequisites
Prerequisites are provide support resources to run the installed process on your target machine.
Visual Setup and Deployment projects are automatically detect the
required prerequisites need to install the system. But the question is
what is the source for install the prerequisites? No need to worry,
Visual Studio IDE provides three options to install the prerequisites on
your system.
- Download prerequisites from component vendor’s website (default option)
- Download prerequisites from the same location as my application
- Download prerequisites from the following location
How to add prerequisites in Visual Studio?
1. Select Project in Solution Explorer, Right click

2. Click the Prerequisites button in Property Pages

3. Select the required prerequisites from the window

Click ‘Ok’, prerequisites will associate based on your install location selection.
IV. Setup file User Interface customization
If you want to customize the installation process screens. Visual Studio provides facility through ‘User Interface’.
Right click of setup project, Select View and Click ‘User Interface’.

Here, you can see the hierarchy tree of installation process screens.
a. Add new dialog window
Step 1: Right click desired selection, Select ‘Add Dialog’
 Step 2:
 Select the dialog which you wish to add
 Step 3:
 New dialog added
 b. Re-order the Screens
Right click of desired screen which you need to move the specific place and select ‘Move Up’ and ‘Move Down’
 c. Change the text and banner images
Right click and select the ‘Properties Window ‘ where you need to edit the text and image.

Once you’ve complete the changes and ‘Build’ the project again. Now, you setup file is professionally ready.
V. Prevent Multiple Instance Running.
How do avoid multiple instance in installed application?
In
Program.cs file add the below code.
static void Main()
{
Application.EnableVisualStyles();
Application.SetCompatibleTextRenderingDefault(false);
Process[] process = Process.GetProcessesByName(Application.ProductName); //Prevent multiple instance
if (process.Length > 1)
{
MessageBox.Show(“{Application Name} is already running. This instance
will now close.”, “{Application Name}”, MessageBoxButtons.OK,
MessageBoxIcon.Information);
Application.Exit();
}
else
{
Application.Run(new <Initial Form>());
}
}
Help me to improve better by sharing your feedback here.